Antique lovers, you will probably want to leave the room for this post. Consider yourselves warned. 😉

I’m about to post pictures of an antique dresser that I (gasp!) painted.
In my defense, I got it from freecycle, and it would have been against the freecycle code of ethics for me to sell it (so I’d never have gotten any money from it anyway.)
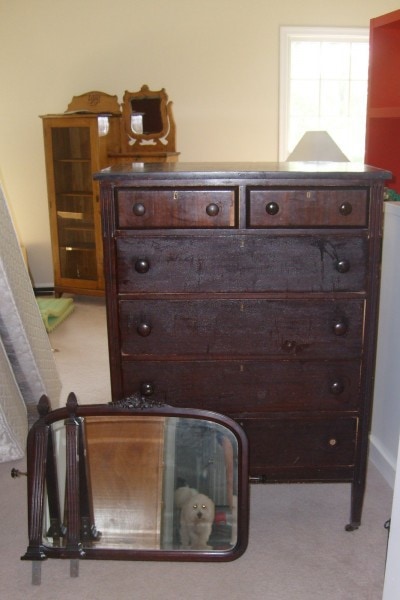
Also, the veneer was not in good shape…the top was missing several chunks of veneer, and the veneer was also peeling off the top two drawers. So, to restore it to a level where one could stain it would have taken a lot more money than I wanted to put into it.

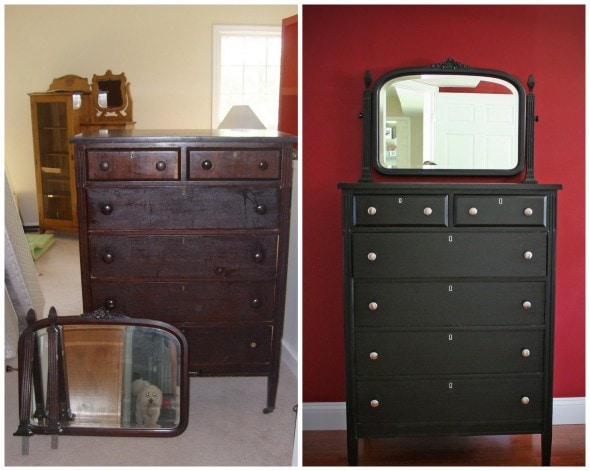
I fixed the veneer on the top, removed the veneer from the top two drawers (some was missing from the one, and I had to take it off the second one in order to remove the lock), sanded it, painted it, bought new hardware, took out the locks and spray painted them silver (they were gold before), and took the wheels off the bottom.
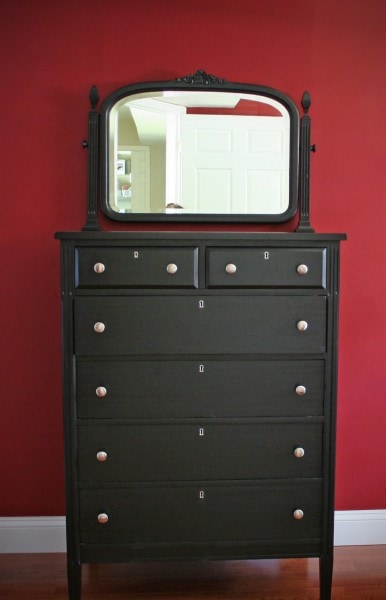
Here’s an after shot of it.
And here’s a picture of the top, so you can see the neat grain pattern in the veneer.
I’m pretty pleased with how my veneer patching came out…I glued some broken pieces of the veneer onto the top before I sanded it all down, and it’s not very noticeable at all.
This replaced a particle board Ikea dresser and another freecycled and painted dresser has replaced the other Ikea dresser, but that’s another post for another day.

I spent about $16 on hardware (LOVE the multipacks of knobs at Home Depot!), less than $4 on paint, and $3 on a can of spray primer.
I already had the can of silver spray paint for the little lock pieces, so there was no new cost involved there.
So, for $23 and about 8 hours of labor, I now have a dresser that looks pretty stinking good compared to what it looked like before.

I love paint.
_________________
Here’s the step-by-step process I use to paint wooden furniture, including a list of supplies.


Cindy
Saturday 22nd of September 2018
I just found your site and it is very helpful. I am in the process of preparing to paint a walnut sideboard and wondering if you still recommend Painters Touch primer and paint as you wrote this post and another post on painting old furniture awhile ago. Thanks for your input
Kristen
Saturday 22nd of September 2018
Yup, I do still like their paint! I like to thin it a little bit, though, as the newer formula is a bit thicker than the old one.
Another good choice is Benjamin Moore Advance paint, but that's more expensive than Painter's Touch. I painted my kitchen cabinets with Advance, and they've held up for years now.
Kevin
Wednesday 24th of September 2014
I'm curious. The paint you show on your web site says soap & water cleanup, but you say to thin with paint thinner if necessary. I thought that would only be used with oil base paints?
Kristen
Wednesday 24th of September 2014
Yes! That was silly on my part...I could have just used water.
Jeanene goodman
Tuesday 9th of September 2014
I followed your instructions on painting a wood table, chair, and bookshelf using all of the same products you did including the black rust oleum semi gloss black paint and it looks good but do I need polyurethane cover over my project? P. S. I researched on many websites before starting and you had the most clear and precise instruction!! Thank Jeanene
Kristen
Tuesday 9th of September 2014
It all depends on how much use the piece will get. A dining room table could definitely benefit from a poly coat, but something that's not treated as roughly wouldn't need as much protection.
Fawn
Sunday 6th of July 2014
Thank you so much. I'm a new home-owner and don't want to spend tons on new furniture, I have several second-hand-pieces that need work, so this is extremely helpful.
Nicole
Wednesday 29th of May 2013
Did you really just pull the veneer off? I have a dresser and end table from the 60's that the veneer is chipping and pulling off most of the 8 drawers. Do you think I could just pull the veneer off, sand and paint to save the dresser?
I only paid $35 dollars for it six years ago so if I ruin it, it's not a terrible loss but I love the shape and would love to salvage it.
Kristen
Wednesday 29th of May 2013
Yep, you can do that. Since you're painting, it's not a huge deal to remove the veneer, whereas if you were staining, the lack of veneer would be very obvious.